[vc_row][vc_column][vc_column_text]
What do you need to know about the Blue Button+?
The Blue Button initiative started in 2010, to empower patients with their health data and improve quality of patient -clinician interaction. Blue Button+ extends the concept to include standardized data formats and added features for trusted, automated exchange of healthcare data, and advanced parsing to improve human readability.
We are going to start with the most basic functionality- allowing others to access the data in your EMR/EHR/PHR since this works you through most of the pieces of the API.
To allow access there are fundamentally 3 steps:
1) Have a system to export data to C-CDA standards
2) Implement a transmission mechanism via. Direct
3) Implement automatic triggers and certificates
Step 1: Export data to C-CDA Standard
Let us understand the nature of data requirements in C-CDA. In terms of coding practices, C-CDA allows for both ICD-9 and ICD-10 usage. You’ll also want to use LOINC for observation, RxNorm for clinical drugs (if applicable) and SNOWMD CT for other clinical terms, primarily for standardization purposes.
You can testyour C-CDA . You can paste your XML and have it scored by assessing key aspects of the structured data found in each document.
A C-CDA file is a collection of XML containing the following sections:
|
Section |
Description |
| Header | Patient information and demographics |
| Allergies, Adverse Reactions, and Alerts | Includes status and severity of each. |
| Encounters | Surgeries, ED visits, etc. |
| Immunizations | Immunizations and vaccines |
| Medications | As prescribed by the provider |
| Care Plan | Planned activities and encounters |
| Discharge Medications | Part of hospital discharge summary |
| Reason for Referral | Written reason for referral |
| Problem List | Concerns, complaints, and observations |
| Procedures | History of procedures |
| Functional and Cognitive Status | List of impairments |
| Results | Includes laboratory tests |
| Social History | Observations like smoking, drinking, etc. |
| Vital Signs | Includes height, weight, blood pressure, etc. |
| Discharge Instructions | Written discharge instructions |
Step 2: Implement a Transmission Mechanism
For transmission you will need to be able to
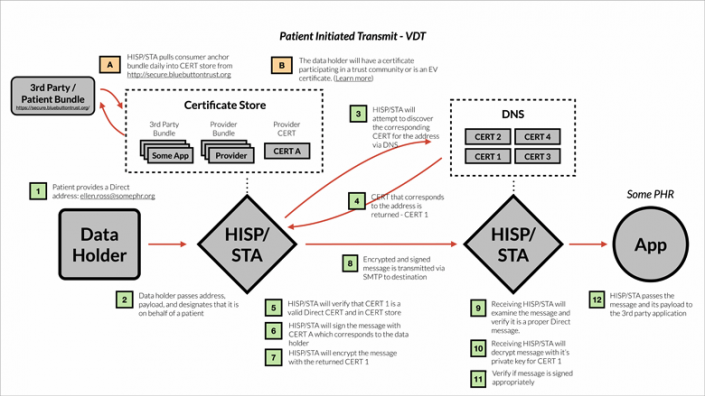
- Send: A message and its payload must be sent via SMTP
- Encrypt: Messages will be encrypted using S/MIM
- Use Encryption Certificates: A STA must discover certificates via DNS or LDAP to encrypt message
- Validate Certificates: Confirm the Certificates are current, valid and Direct-complian
- Sign Messages w. Certificate: Outbound messages should be signed by a certificate
Blue Button+ requires the STA to be configured to
- Retrieve Trust Anchor Bundle: A STA should automatically retrieve the latest Blue Button+ trust bundle
The Direct Project has sample code (reference implementation) showing how transmission should work:
Here is a C# sample, a Java sample and a PHP sample
In brief, when a transmission occurs, the following should be part of the payload as a multi-part MIME:
- Clinical Summary: The primary content of the transmission will be the Clinical Summary, which is a snapshot of a patient’s health history in the EHR. The content format shall use the Consolidated CDA w. Meaningful Use Stage 2 Sections and Fields and have a MIME type of application/xml. If the data holder has not yet implemented MU Stage 2 CEHRT, they may alternatively use the data elements and format required by MU Stage 1 for a Continuity of Care Document / C32.
- Additional Documents: Depending on the trigger or type of encounter, it may also be appropriate to include one of the following:
-
- Transition of Care / Referral Summary
- Ambulatory Summary
- Inpatient Summary
- Transmit Context: The Transmit Context is a plain text / html English language sentence indicating why the message was sent. Literally something like, “This message was sent by ABC Medical Center at the request of XYZ.” The Request Text is a similar to some semi-structured context to machines.
-
- There is no formal definition yet, like
-
- Destination: ellen.ross@somephr.org
-
- Patient: Ellen Ross
-
- Data-holder: Ashby Medical Center
- Recurring: Yes
Step 3: Set up automatic triggers and certificates
As far as triggers ONC, currently there are 5 on their “starting point” list though they strongly encourage additional ones be added:
Triggers for Clinical Systems:
- Discharge or transition to a new care setting (Acute/ER/Inpatient)
- End of encounter (Ambulatory)
- Any time significant new information is received (e.g., new image or lab report)
Triggers for Payer Systems:
- New adjudicated claims data is available
- New explanation of benefits is available
They also indicate that systems that are unable to implement triggers should investigate transmitting records at predetermined time intervals.
When this all comes together the system looks like:

In our next installment, we talk about the BlueButton+ API interface and how to retrieve information from other data sources to create value your customers and automatically fill in information on your own system.[/vc_column_text][/vc_column][/vc_row]
Jeff Bolden
Latest posts by Jeff Bolden (see all)
- Blue Button+: A guide for EMR/EHR/PHR ISV’s (Part 2) - May 8, 2014